View controllers are often the biggest files in iOS projects, and they often contain way more code than necessary. Almost always, view controllers are the least reusable part of the code. We will look at techniques to slim down your view controllers, make code reusable, and move code to more appropriate places.
The example project for this issue is on GitHub.
Separate Out Data Source and Other Protocols
One of the most powerful techniques to slim down your view controller is
to take the UITableViewDataSource part of your code, and move it to
its own class. If you do this more than once, you will start to see
patterns and create reusable classes for this.
For example, in our example project, there is a class
PhotosViewController which had the following methods:
								# pragma mark Pragma

- (Photo*)photoAtIndexPath:(NSIndexPath*)indexPath {
    return photos[(NSUInteger)indexPath.row];
}

- (NSInteger)tableView:(UITableView*)tableView
 numberOfRowsInSection:(NSInteger)section {
    return photos.count;
}

- (UITableViewCell*)tableView:(UITableView*)tableView
        cellForRowAtIndexPath:(NSIndexPath*)indexPath {
    PhotoCell* cell = [tableView dequeueReusableCellWithIdentifier:PhotoCellIdentifier
                                                      forIndexPath:indexPath];
    Photo* photo = [self photoAtIndexPath:indexPath];
    cell.label.text = photo.name;
    return cell;
}
A lot of this code has to do with arrays, and some of it is specific to the photos that the view controller manages. So let's try to move the array-related code into its own class. We use a block for configuring the cell, but it might as well be a delegate, depending on your use-case and taste.
								@implementation ArrayDataSource

- (id)itemAtIndexPath:(NSIndexPath*)indexPath {
    return items[(NSUInteger)indexPath.row];
}

- (NSInteger)tableView:(UITableView*)tableView
 numberOfRowsInSection:(NSInteger)section {
    return items.count;
}

- (UITableViewCell*)tableView:(UITableView*)tableView
        cellForRowAtIndexPath:(NSIndexPath*)indexPath {
    id cell = [tableView dequeueReusableCellWithIdentifier:cellIdentifier
                                              forIndexPath:indexPath];
    id item = [self itemAtIndexPath:indexPath];
    configureCellBlock(cell,item);
    return cell;
}

@end
The three methods that were in your view controller can go, and instead you can create an instance of this object and set it as the table view's data source.
								void (^configureCell)(PhotoCell*, Photo*) = ^(PhotoCell* cell, Photo* photo) {
   cell.label.text = photo.name;
};
photosArrayDataSource = [[ArrayDataSource alloc] initWithItems:photos
                                                cellIdentifier:PhotoCellIdentifier
                                            configureCellBlock:configureCell];
self.tableView.dataSource = photosArrayDataSource;
Now you don't have to worry about mapping an index path to a
position in the array, and every time you want to display an
array in a table view you can reuse this code. You can also implement
additional methods such as
tableView:commitEditingStyle:forRowAtIndexPath: and share that code among
all your table view controllers.
The nice thing is that we can test this class separately, and never have to worry about writing it again. The same principle applies if you use something else other than arrays.
In one of the applications we were working on this year, we made heavy use of Core Data. We created a similar class, but instead of being backed by an array, it is backed by a fetched results controller. It implements all the logic for animating the updates, doing section headers, and deletion. You can then create an instance of this object and feed it a fetch request and a block for configuring the cell, and the rest will be taken care of.
Furthermore, this approach extends to other protocols as well. One
obvious candidate is UICollectionViewDataSource. This gives you
tremendous flexibility; if, at some point during the development, you
decide to have a UICollectionView instead of a UITableView, you
hardly have to change anything in your view controller. You could even
make your data source support both protocols.
Move Domain Logic into the Model
Here is an example of code in view controller (from another project) that is supposed to find a list of active priorities for a user:
								- (void)loadPriorities {
  NSDate* now = [NSDate date];
  NSString* formatString = @"startDate <= %@ AND endDate >= %@";
  NSPredicate* predicate = [NSPredicate predicateWithFormat:formatString, now, now];
  NSSet* priorities = [self.user.priorities filteredSetUsingPredicate:predicate];
  self.priorities = [priorities allObjects];
}
However, it is much cleaner to move this code to a category on the User class. Then
it looks like this in View Controller.m:
								- (void)loadPriorities {
  self.priorities = [self.user currentPriorities];
}
and in User+Extensions.m:
								- (NSArray*)currentPriorities {
  NSDate* now = [NSDate date];
  NSString* formatString = @"startDate <= %@ AND endDate >= %@";
  NSPredicate* predicate = [NSPredicate predicateWithFormat:formatString, now, now];
  return [[self.priorities filteredSetUsingPredicate:predicate] allObjects];
}
Some code cannot be easily moved into a model object but is still
clearly associated with model code, and for this, we can use a Store:
Creating the Store Class
In the first version of our example application, we had some code to load data from a file and parse it. This code was in the view controller:
								- (void)readArchive {
    NSBundle* bundle = [NSBundle bundleForClass:[self class]];
    NSURL *archiveURL = [bundle URLForResource:@"photodata"
                                 withExtension:@"bin"];
    NSAssert(archiveURL != nil, @"Unable to find archive in bundle.");
    NSData *data = [NSData dataWithContentsOfURL:archiveURL
                                         options:0
                                           error:NULL];
    NSKeyedUnarchiver *unarchiver = [[NSKeyedUnarchiver alloc] initForReadingWithData:data];
    _users = [unarchiver decodeObjectOfClass:[NSArray class] forKey:@"users"];
    _photos = [unarchiver decodeObjectOfClass:[NSArray class] forKey:@"photos"];
    [unarchiver finishDecoding];
}
The view controller should not have to know about this. We created a Store object that does just this. By separating it out, we can reuse that code, test it separately and keep our view controller small. The store can take care of data loading, caching, and setting up the database stack. This store is also often called a service layer or a repository.
Move Web Service Logic to the Model Layer
This is very similar to the topic above: don't do web service logic in your view controller. Instead, encapsulate this in a different class. Your view controller can then call methods on this class with a callback handler (for example, a completion block). The nice thing is that you can do all your caching and error handling in this class too.
Move View Code into the View Layer
Building complicated view hierarchies shouldn't be done in view
controllers. Either use interface builder, or encapsulate views into
their own UIView subclasses. For example, if you build your own date
picker control, it makes more sense to put this into a
DatePickerView class than creating the whole thing in the view
controller. Again, this increases reusability and simplicity.
If you like Interface Builder, then you can also do this in
Interface Builder. Some people assume you can only use this for view
controllers, but you can also load separate nib files with your custom
views. In our example app, we created a PhotoCell.xib that
contains the layout for a photo cell:
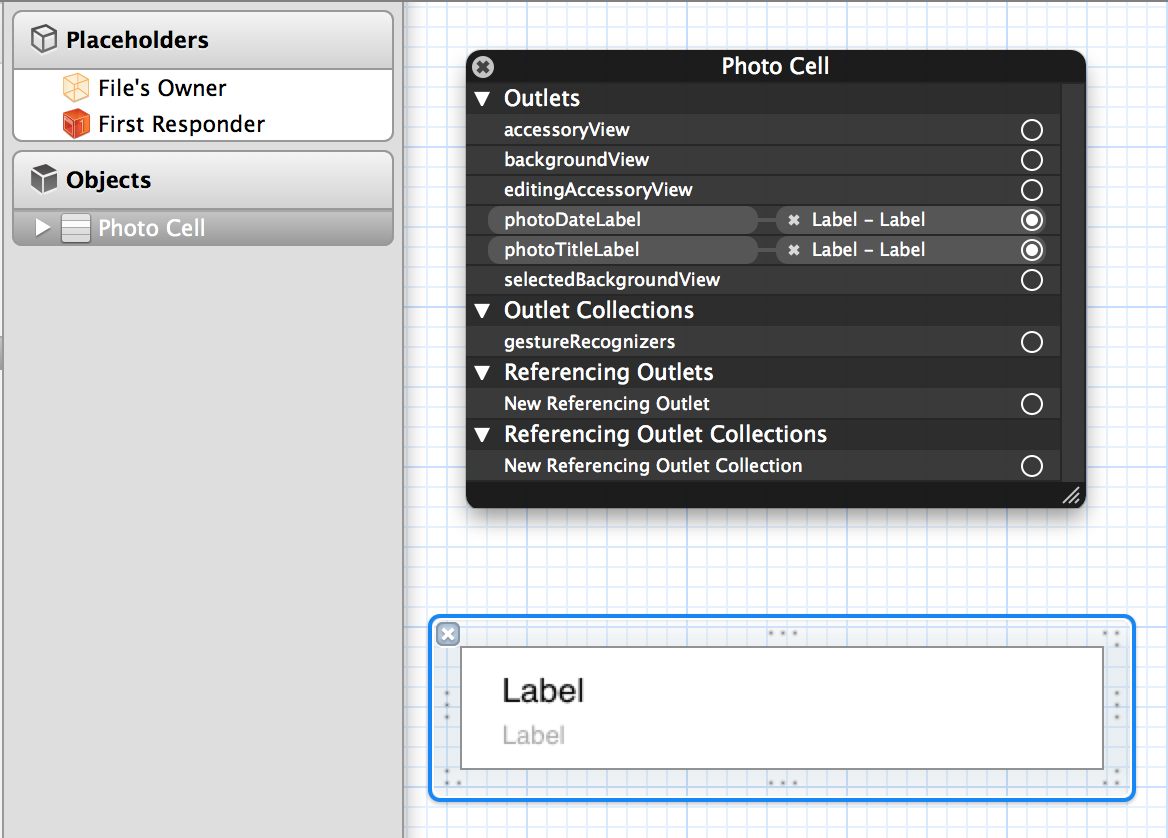
As you can see, we created properties on the view (we don't use the File's Owner object in this xib) and connect them to specific subviews. This technique is also very handy for other custom views.
Communication
One of the other things that happen a lot in view controllers is communication with other view controllers, the model, and the views. While this is exactly what a controller should do, it is also something we'd like to achieve with as minimal code as possible.
There are a lot of well-explained techniques for communication between your view controllers and your model objects (such as KVO and fetched results controllers), however, communication between view controllers is often a bit less clear.
We often have the problem where one view controller has some state and communicates with multiple other view controllers. Often, it then makes sense to put this state into a separate object and pass it around the view controllers, which then all observe and modify that state. The advantage is that it's all in one place, and we don't end up entangled in nested delegate callbacks. This is a complex subject, and we might dedicate a whole issue to this in the future.
Conclusion
We've seen some techniques for creating smaller view controllers. We don't strive to apply these techniques wherever possible, as we have only one goal: to write maintainable code. By knowing these patterns, we have better chances of taking unwieldy view controllers and making them clearer.